Using webCampus Guide
| Site: | UWS webCampus |
| Course: | UWS webCampus |
| Book: | Using webCampus Guide |
| Printed by: | |
| Date: | Sunday, June 21, 2026, 12:02 AM |
Description
Look here for important tips about navigating your course, controlling valuable webCampus settings, and web browser recommendations for optimal functioning.
Table of contents
- Welcome
- webCampus System Requirements
- Navigating webCampus
- Assignments and Forums
- How to use Forums
- How to Change Your webCampus Profile Settings
- Communication Tools and Settings
- How to View Course Grades
- How to Review Your Online Quiz Results
- ProctorU: UCard and Proctored Exams
- Turnitin: Electronic Plagiarism Detection
- How to Review Assignments and Forums graded with a Rubric
- Panopto Tips
- Zoom - online meeting tool
Welcome
This is your resource for all things related to webCampus, UWS' Moodle-based learning management system. Here you will find guides, articles and video demonstrations to help you become familiar with the webCampus environment. Use the Table of contents in the right-hand column to learn more about a topic.

webCampus System Requirements
Operating systems
Recommended: Windows 7, 8, or 10, Mac OSX 10.7+
Mobile devices: At present, due to the marginal performance of the My Moodle app, we recommend that on a mobile device you login to webCampus using a normal web browser (Chrome or Firefox recommended). This is particularly important if you are completing an assessment or activity that has a grading component.
For DC Students only: See our Digital Device Requirements page on the UWS site.
Computer Requirements
RAM: 4GB (minimum) -- Most every computer on the market will have 4 GB minimum / 8 GB or more (recommended for multi-tasking)
Recommended CPU: 1.8 GHz or higher (minimum) / Any dual core or quad core CPU recommended (required for Panopto)
Peripherals:
For online programs, students need the following:
- Either a built-in camera or a camera connected to your computer (needed for online proctored exams)
- Microphone and speakers, or headset combination - the latter is recommended for best audio quality and noise reduction.
Internet speed
Use a broadband connection (500 Kbit/sec or faster, preferably 1 mb/s or faster) via cable, DSL, T1/T2, or USB wireless modem. This will ensure that you can view videos and online presentations. Dial-up access will be significantly slower and is not recommended.
Internet browsers
Please use recent versions of Mozilla Firefox (Windows, Mac), or Google Chrome (Windows, Mac).
Note:
- Firefox is the recommended browser to use on Windows computers to access webCampus. Internet Explorer and Edge are not recommended.
- Be aware that add-ons and toolbars can adversely affect a browser's performance.
Settings
We recommend that the following be enabled in your browser for webCampus:
- Pop-ups (in both web browser and security software): If you leave pop-ups disabled, please add exceptions for https://webcampus.uws.edu. If you do not know how to do that, you can find instructions at this wikiHow page.
- Cookies: If you disable cookies, please add the same exceptions in your browser security settings.
Plug-ins and Resources
We recommend that you update to the latest versions of the Adobe Flash Player and Adobe Acrobat Reader.
Panopto viewing requirements
Recorded lectures are provided by Panopto, a video platform service. Panopto requires industry-standard PC hardware components. Please treat the following configurations as the recommended baseline system configurations.
|
Microsoft |
Windows 7 and above |
|
Apple |
Mac OS X 10.11 and above (PPC-based NOT supported) iOS 6+ |
|
Processor |
1.8 GHz or higher |
|
Memory |
1 GB |
|
Network Bandwidth |
50 Kbps for audio-only presentations. 300 Kbps for presentations with one video stream, audio, PowerPoint and screen capture. 500 Kbps for presentations with multiple video streams. |
|
Applications |
HTML 5 (Flash for Sarari 10) |
|
Supported Browsers |
Panopto supports the latest versions of Chrome, Edge, Internet Explorer (11), Firefox, and Safari |
Note: Flash is required to view videos on Safari 10.
Navigating webCampus
Finding Your Courses in webCampus
There are many ways to access your courses in webCampus. The Home Page, the Dashboard, and the Navigation Drawer are three common options.
Home Page
Below the Site News and Announcements on the homepage, you will find a list of courses and resources. Click the arrows to the left of the course category names to view more subcategories and courses.
You can also use the search field to quickly access a specific course.

Dashboard
The Dashboard is available in the top navigation bar on all pages and provides an overview of courses that you are enrolled in.

Courses are separated by In Progress, Future, and Past. Click a course name to go directly to it.
If course completion has been enabled for a course, you will see a graph indicating your percentage of completed activities in the course.
NOTE: This may not accurately reflect your actual state of completion, as it is dependent on how a course's completion criteria have been set.

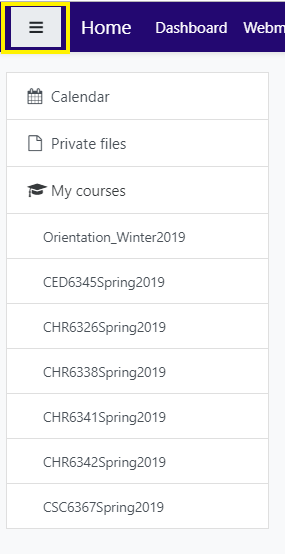
Navigation Drawer
The left column of webCampus can be hidden or displayed using the button to the left of Home in the top navigation bar. Display the navigation drawer to quickly view your current courses, or hide it to expand the main content area.
Assignments and Forums
How to Post or Reply to a Discussion Forum
The forum tool allows users to participate in online course discussions. Each instructor may have different expectations regarding forum participation. Check your course syllabus or ask your instructor regarding forum participation in your course. Follow these steps to post or reply in a Discussion Forum
How to submit an Assignment
The Assignment tool allows teachers to collect work, review it, and provide feedback including grades online. Follow these instructions to learn more about submitting your assignment in a course.
How to use Forums
How to manage your Forum subscriptions
Online courses include an Activities block which allows you to review course activities and manage your course forum subscriptions.
Log in to your course and look for the Activities block along the right hand column.
Select the Forums or Open Forums link in the Activities block.
A page will open allowing you to review and manage your course forum subscriptions. If your course includes both Forums and Open Forums, you will need to manage each forum type separately.
There are links to subscribe to or unsubscribe from all available forums. You can also scroll down the list to review which forums you are subscribed to in the course and edit them if needed.
How to Add a Picture to your Forum Post
You can add an image/picture in the textbox feature of Forum posts by opening the edit feature of the activity. The textbox will display these editing tools. The photo icon allows you to insert and edit Images.

Click on the photo icon to add an image.
For more details, follow these instructions.
Forum Tips for Clearing Text Formatting Issues
You may have noticed some text formatting issues when copying and pasting text into your forum discussions. Small font sizes and multiple font styles can make a discussion post difficult to read. Try these tips for copying and pasting text into discussion
forums.
Best advice:
- Use keyboard commands to copy and paste plain text:
- Copy: Ctrl + C (for PC) Command + C (for Mac)
- Paste Plain Text: Crtl + Shift + V (for PC) Shift + Option + Command + V (for Mac)
- Use NotePad (PC) or TextEdit (Mac) to type your discussion post. The plain text editor will paste a cleaner version of the text that you can format using the Atto text editor.
Using MS Word:
- Tip 1: If you copied your text from MS Word, highlight the text and click the "Clear Formatting" (Tx) button to remove the excess style commands in the HTML code. On the downside, additional formatting like bold, italics and underline will also be removed.
- Tip 2: Copy text from MS Word and paste to NotePad (or TextEdit) to remove excess code. Then, copy the NotePad (or TextEdit) text to paste into the forum.
Webpages:
- Copying text or a citation from a webpage can cause problems with formatting. Paste your copied text into NotePad or TextEdit to remove excess code or links to the site.
- In some cases, copying text from a webpage can generate an "Error writing to database" message that prevents you from posting. When that happens, review the text for a rectangle icon hiding in the text and delete it.
How to Export/Download Discussion Forums
Forums and MoodleRooms Forums include the option to export single posts or the whole discussion into an HTML document. To learn more
about exporting forum discussions to save or print for your archives, follow these instructions.

The Export whole discussion to portfolio button allows you to download the entire discussion thread.
How to Change Your webCampus Profile Settings
Your profile page can be accessed by clicking your name in the upper right-hand corner and selecting Profile from the menu. This page displays basic user information along with a profile picture.

On your profile page, you can add a photo that will display in your courses, edit your home city, add a description about yourself, and lists interests as a way for your instructors and fellow students to get to know you. Read these instructions for more details on how to update these settings.
Have a nickname? Want to add your middle name to your profile? You can update your profile to include your preferred name by following these steps.
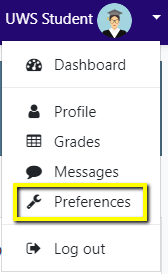
Preferences
The Preferences link can be found in your user menu in the top right corner. It allows you to customize your profile, forum, messaging and notification settings.

You probably won't ever need to use most of the links provided on the Preferences page. Here is a brief description of the commonly used Preferences links:
Edit profile: Use this link to add a nickname or middle name, attach a photo, or list any interests you wish to share.
Forum preferences: You can control how frequently you receive email notifications regarding posts from course discussion forums.
Messaging preferences: Customize how you would like to receive personal messages in webCampus.
Notification preferences: Customize when and how you want to be notified of course activity updates.
Communication Tools and Settings
In a webCampus course, messages can be generated and received in a variety of ways. Some messages are initiated by instructors or students. Others are automatically triggered, for instance, by the submission or completion of an activity. Messages keep you informed about ongoing course activity (for instance, forum posts), or your course progress (for instance, an assignment was graded).
The number of messages in an active course can get overwhelming. Luckily, all users have options as to how they receive these messages, or even if they receive them at all. The following should be helpful in setting up messaging options that work for you.
Controlling Forum Subscriptions
Your webCampus course can generate a lot of email if you have very active discussion forums. However, you can control whether or not you are "subscribed" to a forum - it's your choice whether you receive new forum posts in your email or just view them in your course. You can even control whether you receive an individual email every time a message is posted or if you want to receive one summary email per day that includes posts from all forums to which you subscribe.
If you do not wish to receive these emails, you can minimize or prevent them by changing your Profile and/or Forum settings. (See note below regarding messages sent by an instructor via the news forum.)
1. How to Edit your Forum Preferences
The profile default is set to auto-subscribe you to a forum once you post to it. You can disable this setting (and stop future automatic subscriptions) by doing the following:
- Click Preferences in your profile options in the top right corner of the site.
- Under User account, click Forum Preferences.
Select Email Digest Type to Control webCampus Email Frequency
If you want to reduce the number of emails you receive from your subscribed forums, set the Email digest type to either Complete (daily email with full posts) or Subjects (daily email with subjects only). Either of these settings will send you a single email at with all of the posts of the last 24 hours in a single message and will include links to the course forum.

Choose the Email digest type that works best for you:
- No digest - you will receive one e-mail per forum post
- Complete (daily email with full posts) - you will receive one digest e-mail per day at 5 p.m. (Pacific) containing the complete contents of each forum post
- Subjects only (daily email with subjects only) - you will receive one digest e-mail per day at 5 p.m. containing just the subject of each forum post.
Disable Auto-Subscribe
Locate the Forum Auto-Subscribe field and use the pull-down menu to change the setting to No: don't automatically subscribe me to forums.
This setting will apply to future forums in which you post in all of your course sites. If you are currently subscribed to a forum, you must unsubscribe yourself as shown below.

Bonus Tip: Set the Forum tracking option to Yes, highlight new posts for me. When you go to your course, this setting indicates when new messages have been posted by your instructor and classmates.
![]()
2. Unsubscribe from Currently Subscribed Forums
Unlike updating your profile which effects this change for all of your courses, this process needs to be completed in each of your current courses where you have participated in a discussion forum and generated a subscription.
To unsubscribe from a forum:
- Open the forum.
- Click on Unsubscribe from this forum in the Administration block.
Bonus Tip: In "Advanced forums," you can also see who has posted to a forum by clicking on View posters, or download the discussion posts by clicking Export.

Optional Subscriptions
When you post to a discussion forum, your instructor may give you the option of subscribing to it. To subscribe, click on the link in the Administration block.
Some forums may be set up so that everyone is subscribed without having the option to unsubscribe. Ask your instructor if you have questions about a particular forum.
Note: The Course News and Announcements forum is the one forum from which you cannot unsubscribe. Instructors use this forum to communicate important information about the course, so everyone in the course will receive an email when the instructor posts to this forum. It's helpful to know, too, that this is not a true forum—it's a form of one-way communication for instructors to post announcements for course participants. You cannot reply to a news forum posting.
The Activities block for course Forum subscription management

Your course includes an Activities block which allows you to review course activities and manage your course forum subscriptions. If your course includes both standard Forums and Open Forums, you will need to manage each forum type separately.
Select the Forums or Open Forums link in the Activities block.
![]()
The following page will open:

There are links to subscribe to or unsubscribe from all forums. Yes! This does it for the entire course with one click.
Optionally, you can have fine control over each forum via the Email digest type drop-down menu. Use this control if you want to be subscribed, but want to choose between a single email for each post (No digest), the complete post in a one-email-per-day digest, or just the post subject in a one-email-per-day digest.
Controlling Message and Notification Settings
There are currently four types of message outputs in webCampus:
- Activity stream: is a user's history of events in the system. Messages are displayed via the Activity stream block. Think of this as a “news feed.” This block is an option you can add to your Dashboard page.
- Email: communicates information to the user when they are offline (mostly) and a user needs to interact with the communication outside of webCampus (forward, reply, document proof). Messages are sent to a user’s UWS email address.
- Messages: chat with classmates or instructors in real time! You can search for contacts and filter results by course or name to easily find peers who are taking the same classes. The message icons appears directly to the left of your username (see screen shot below).
- Notifications: Choose how webCampus sends you notifications on a range of items such as assignments, feedback, forums, and quizzes. The notifications icon appears directly to the left of the messages icon (see screen shot below).

You can set virtually any message that is generated from webCampus (from instructors, other users, automatically triggered by activities, etc.) to be displayed whatever way you wish to receive them.
Click Preferences in your profile options in the purple bar along the top of the site.
Message preferences
To navigate to the messaging options, locate the Message preferences link.

The message preferences screen will open:

For each type of message generated you can choose if, where, and when you want it to display.
When to receive messages:
- Online: When checked, the message is sent via the selected output type when you are logged in to webCampus. Consider, “Do I want to see this message, and how do I want to see it?”
- Offline: When checked, the system sends the message (email) or displays it when you log back in (Alert badge, Popup, Activity stream).
Note: If Offline is not checked, Activity stream messages, and notifications will not be sent and will not be displayed when you log back in.
Notification Preferences
For notification settings, navigate back to the Preferences options and locate the Notification preferences link.

The list has many options, so carefully go through the categories – there are eight possible choices for each!

We recommend that students set their Email or Alert badge notification to "On" for the following notification options:
- Assignment: Notification sent to student informing that an assignment has been graded by the Teacher.
- Feedback: Notifications sent to students informing them that there is feedback from their teacher.
- Forum/Open Forum: Notifications are sent if you are subscribed to a forum that there has been a post or comment.
- Quiz: Notification sent to student informing that a quiz has been submitted for grading.
- BlackBoard Inc. > Activity graded: Notifications sent to students informing that their instructor has graded an activity.
- BlackBoard Inc. > Course grade changed: Notification sent to the manager, instructor and student informing that the course grade has changed for a student.
We recommend that faculty set their Email or Alert badge notification to "On" for the following notification options:
- Assignment: Notifications sent to managers and instructors when assignments are submitted.
- Forum/Open Forum: Notifications are sent if you are subscribed to a forum that there has been a post or comment. How you receive them in your email – individual posts or digest form – is set in your Profile (instructions at end of this document).
- Quiz: Notifications sent to managers and instructors when quizzes are submitted.
How to send a message to your instructor (or anyone in your course)
Messages can be sent between users in webCampus. They are sent within the online course platform similar to a text if the user is online. When users are offline the message will also be sent via email. Follow the steps in these instructions to send a message.
How to send messages using Quickmail
Your course includes a messaging tool called Quickmail, located in block along the right side of the course content, which allows you to send messages to individuals or groups in the class. Messages sent via Quickmail will be delivered to the recipient’s UWS email address.

For more information about sending messages with Quickmail, check out these instructions.
Note: Quickmail is different than UWS email (or webmail). Quickmail allows you to send, but not receive messages in the course. To exchange and track conversations, use UWS email (webmail) or the webCampus messaging option.
How to View Course Grades
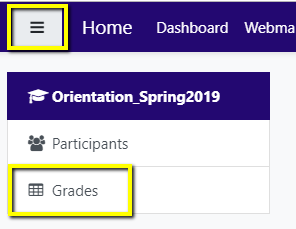
Course grades can be accessed via your profile menu or the navigation drawer in the left-hand column.
Profile Menu
An overview report of your grades is available via your Profile menu in the top right corner. Select the Grades option to see an overall view of your course grades on one page. Select the course title to view the course grade book details.

Navigation Drawer
You can also view your grades when participating in your course. Use the button in the upper left-hand corner to display the navigation drawer and you will see a link to your grades for that course.
How to Review Your Online Quiz Results
Some quizzes in the program are set to allow students to review their selected answers or view correct/incorrect marks after the quiz has closed.
To review your results, click in the quiz that you want to review. On the introduction page of the quiz, you will see a small table with your quiz attempt information. Click Review to review the quiz and your results.

The Quiz Navigation in the top left corner provides each question number with a color code to indicate your results:

- Correct responses are green with a check mark.
- Incorrect responses are solid red.
- Partially correct responses are yellow with a circle.
- Ungraded responses arewhite. Ungraded responses will occur for questions that require manual grading (i.e. essay questions).
Each question number in the Quiz Navigation is a link. This shortcut allows you to click on the number of the question that you want to review.
Your responses will have a red x to indicate an incorrect selection or a green check mark to indicate a correct selection. Your feedback will appear highlighted in yellow.

Note: Your review results will vary based upon the review settings your instructor applies. Some quizzes and exams are not set to display correct answers or questions may not include feedback.
ProctorU: UCard and Proctored Exams

Our online programs have a number of requirements for maintaining our academic accreditation. One of those is validating the identity of all online students and collecting reasonable proof that the work submitted by an online student was done by that student. This is an essential component of assuring academic integrity.
ProctorU: UCard
All online students must create a UCard for online identification. Your UCard will help with the identification process during proctored exams. This walkthrough will guide you through the proctored Ucard creation process.
A web camera, microphone and speakers will be required for creating a Ucard.
ProctorU Live+
UWS uses ProctorU as our online proctoring service to verify test-taker identity and prevent cheating on high-value examinations.
ProctorU Live+ is a live, online proctoring service to verify test-taker identity and ensure the integrity of an exam. Using almost any webcam and computer, you can take exams anywhere you have internet access and a private space. Your instructor will provide more detailed information about which exams will be proctored and when to set up your proctoring session appointment.
ProctorU Live+ Student Handout
Prior to starting a scheduled exam with a live proctor, students should be prepared with the following:
- Make sure that you have the latest version of Chrome or FireFox web browsers installed.
- Download the Chrome ProctorU extension or Firefox ProctorU extension that corresponds to the web browser you will use during the exam.
- Make sure that your web camera, speakers and microphone are working correctly. You will need them during the proctoring appointment.
- Have a government issued photo identification to show to the proctor.
More Information about using ProctorU
- Instructions: How to Schedule and Attempt a ProctorU Exam
- ProctorU Live+ requires Chrome or FireFox for live proctoring sessions.
- How to download and install the Google Chrome web browser on your computer
- Not sure if you are using the latest version of Chrome? Generally, Google Chrome updates automatically. Here is how to check if your computer is up to date.
- How to download and install Mozilla FireFox web browser on your computer.
- Test your Equipment here.
- Test-taker Resource Center - This page includes information from ProctorU and answers to Frequently Asked Questions.
Turnitin: Electronic Plagiarism Detection
UWS is committed to maintaining the highest standards of academic integrity. This is necessary to preserve the value of each degree earned by our students and to fulfill accreditation requirements. To enable faculty members to more reliably identify instances of plagiarism, we have incorporated Turnitin detection software into the webCampus learning management system. This software may be used to evaluate written assignments, discussion forum posts, essay responses on tests or quizzes and any other written work submitted as part of your courses.
It is essential to recognize that even unintentional plagiarism is a serious violation of the UWS student conduct code. Please review this information if you are unsure of your responsibilities as a student and to understand the potential consequences of academic dishonesty. The Harvard guide to recognizing and avoiding plagiarism is another excellent resource. If you have remaining questions, please contact your instructor or the program director.
How to Review Assignments and Forums graded with a Rubric
Some instructors use online rubrics to grade assignments and discussion forums. If your course utilizes rubrics, you can review your results in Open Grader.
Access Open Grader by clicking the gear icon in the upper right corner of the course header.

Using the drop-down menu in the top right corner, select the assignment that you want review.

Your submitted work will display on the left. Select the View graded rubric button in the grading column on the right to view your results in a pop-up window.

- Your
grades for each criterion are highlighted in green.
- Comments
will appear in a criterion row as overall feedback at the bottom of the list.
- Select
the X in the top right corner or the
Close button to close the rubric.
Panopto Tips

Your lecture videos will be provided by Panopto. In the blocks column of your course, videos will be posted as links in the Panopto block. Click on the title to open the video in a new window.

Tutorial Video: Viewing Panopto Videos
Other Resources:
How to Troubleshoot Panopto Viewing Issues
Podcasting and RSS Feeds
Panopto makes MP3 and MP4 versions of every recording available through podcasts for iTunes and RSS feeds. By subscribing to the feed, the podcast from each new recording in a folder will automatically be downloaded. The downloaded content can then be listened to or viewed using any device capable of playing back MP3/MP4 files.
Log in to the UWS Panopto server at https://uws.hosted.panopto.com/ and locate your course Panopto folder. The Subscription options will appear as a drop-down menu under the Subscribe icon.

**Note: Currently podcasting and RSS feeds will not work in Google Chrome. The browser does not natively support RSS feeds. We currently recommend using Firefox for accessing Panopto and webCampus.
Review the Panopto: Podcasting and RSS Feeds documentfor step-by-step instructions and subscription options.
Panopto tips for iTunes users:
Downloading Panopto Videos
By default, most course Panopto folders are not set to allow direct download. However, some instructors will update their course folder settings to encourage users to archive lectures for future reference.
If the download option has been enabled, you will see a downward pointing arrow icon in the top bar as you view the presentation.

Note: If the viewing window is too small, the download icon may not display in the collapsed view. Expand the window to see all options available in the menu bar.
Panopto Assignments
Some instructors might ask you to create your own Panopto recordings and presentations. To allow you to record with Panopto, you will be granted permission at https://uws.hosted.panopto.com/ in an assignment sub-folder for the course.
For example:

Download the Panopto recorder to your computer, phone or tablet to record your video to share with the instructor. You can also upload a video recorded on your phone, tablet or other recording software.
Review the instructions that apply to your preferred recording method. You might find that the mobile app will work best for recording in the field.
When logging into the recorder for the first time, you may be prompted to enter a server name. Enter uws.hosted.panopto.com into the server field.
Instructions for installing the Panopto recorder on your computer or mobile device
Panopto Instructions: Installing the Panopto Recorder on your Computer
Panopto Instructions: Installing the Panopto recorder and recording on your Android device
Panopto Instructions: Installing the Panopto recorder and recording on your iPhone
Panopto Instructions: Installing the Panopto recorder and recording on your iPad
Instructions for uploading recordings to Panopto
If you record your presentation on a phone, tablet or use other recording software, you can upload the file to the Panopto course assignment sub-folder directly. Open a web browser page and go to https://uws.hosted.panopto.com/ to log in and locate your course Panopto folder.
Zoom - online meeting tool

Zoom is an online meeting tool that instructors might use for live lectures, Q & A sessions or one-on-one meetings. Instructors will post a link to join their Zoom meeting in the course material or in the Course News Announcements Forum.
For a short tutorial video from Zoom's One Minute Video Introductions:
Join a Meeting:
Configuring Audio and Video:
Not at a computer? Try the Zoom Mobile App for Apple or Android. There are quite a few Apps on this web page, scroll about a third of the way down to the Zoom Mobile Apps section and select the app for your device.
Background Colour
Font Face
Font Kerning
Font Size
Image Visibility
Letter Spacing
Line Height
Link Highlight
Text Colour